

Ultimate Guide to Cosplay Foam Techniques in 2026
Cosplay is evolving faster than ever, and 2026 is the year when innovation meets artistry. Modern creators are pushing boundaries, using advanced materials and new methods to achieve show-stopping results.
The heart of this transformation is cosplay foam, a lightweight and versatile material that has become the foundation for realistic armor, props, and accessories. Whether you are a newcomer or a seasoned builder, understanding the latest foam techniques can elevate your craft to professional levels.
This guide will break down everything you need to know: from foam types and tools, to step-by-step construction and finishing secrets. Expect actionable advice, expert tips, and the newest methods shaping the cosplay world.
Ready to unlock your potential and master cosplay foam techniques for 2026? Let’s dive in and transform your next costume build.
Understanding Cosplay Foam: Types, Properties, and Selection
Choosing the right cosplay foam is the foundation of any successful build. With evolving materials and techniques in 2026, a solid understanding of foam types, properties, and selection strategies will set your creations apart.
What is Cosplay Foam?
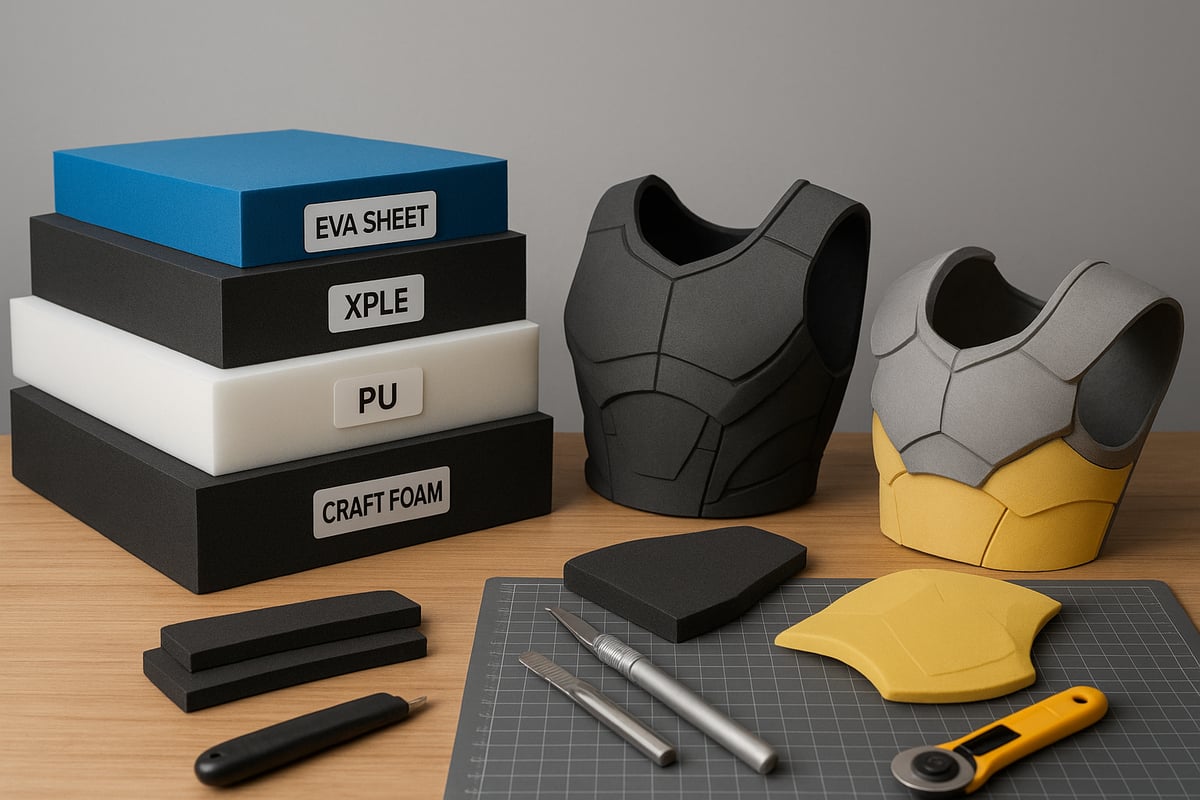
Cosplay foam refers to a range of flexible, lightweight materials used to create costumes, armor, and props. EVA foam dominates the field due to its closed-cell structure, which offers durability and a smooth finish. Other foams, such as crosslinked polyethylene (XPLE), polyurethane (PU), and basic craft foam, are also popular for specific effects or details.
The closed-cell structure of these foams means they resist water and are easy to shape, sand, and paint. For example, EVA foam is commonly used for making armor plates, large props, and detailed accessories. XPLE excels where extra rigidity is needed, while PU is often chosen for lightweight, flexible pieces. Selecting the right cosplay foam starts with knowing these material basics.
Key Properties to Consider in 2026
When choosing cosplay foam, pay close attention to density, thickness, texture, and color. Foam density, such as EVA 38 (38kg/m³), affects flexibility, weight, and durability. Higher density foams are sturdier but heavier, while lower densities are easier to shape for organic forms.
Thickness options range from 2mm for intricate details to 20mm for structural parts. Surface texture matters too: smooth foams are ideal for armor, while patterned variants add realistic effects like diamond plate or crosshatch. Although foam is available in many colors, base color has little impact since most builds are primed and painted. Ensuring your cosplay foam has the right properties will make finishing and painting much easier.
Comparing Foam Types for Cosplay Builds
Each cosplay foam type offers unique advantages and drawbacks. Here's a quick comparison:
| Foam Type | Pros | Cons | Typical Use |
|---|---|---|---|
| EVA | Durable, easy to shape, widely available | Slightly heavier | Armor, props |
| XPLE | Rigid, smooth finish | Less flexible | Shields, rigid props |
| PU | Lightweight, very flexible | Less durable | Organic shapes, masks |
| Craft Foam | Inexpensive, easy to cut | Not durable, limited thickness | Small details, accents |
Cost varies: EVA and craft foam are found in hobby stores, while XPLE and PU may require specialty suppliers. For larger builds, internal supports like PVC or wooden dowels can reinforce the structure. For example, combining 6mm EVA for a chest plate, 4mm for detail, and 2mm for accents creates depth and durability in your cosplay foam project.
Sourcing Quality Foam in 2026
Finding high-quality cosplay foam is easier than ever in 2026. You can purchase foam from craft and hardware stores or through online specialty suppliers. Bulk buying saves money, but beware of general-purpose exercise mats, which may differ in density or finish from cosplay-grade foam.
To ensure authenticity, look for foam with a consistent texture and slight flexibility. Price varies by thickness and grade, with premium sheets costing more but delivering better results. For a wide selection of reliable EVA foam options tailored to cosplay, explore the Craft EVA Foam Sheets Collection for your next build.
Choosing the Right Foam for Your Project
Selecting the best cosplay foam for each costume part is essential for comfort and realism. Use thicker, denser foam for structural elements like armor, and lighter foam for masks or accessories. Always balance weight and comfort, especially for costumes worn at conventions.
Case Study: Large props benefit from 10mm EVA with PVC reinforcement, while wearable pieces like gauntlets use 4mm foam for flexibility. Before starting, run through this checklist:
- Does the foam match the required thickness?
- Is it flexible or rigid enough for the design?
- Will it be comfortable for extended wear?
- Is it easy to cut, shape, and finish?
By following these steps, your cosplay foam projects will be comfortable, durable, and visually stunning.
Essential Tools and Materials for Modern Foam Cosplay
Selecting the right tools and materials is crucial for achieving professional results with cosplay foam. Whether you are a beginner or an advanced crafter, having a well-equipped workspace can make every step, from cutting to finishing, more efficient and enjoyable.
Cutting and Shaping Tools
Accurate cutting is the foundation of any cosplay foam project. The most popular tools include sharp Xacto knives, razor blades, heavy-duty scissors, and rotary tools for intricate details. Always use a fresh blade to prevent ragged edges and maintain precision.
A hot knife can make quick work of bevels and angled cuts, especially on thicker foam. For large-scale builds, consider sourcing high-quality EVA Foam for Cosplay Rolls to ensure consistent results. Remember to cut on a self-healing mat and always prioritize safety by wearing cut-resistant gloves and keeping your workspace clutter-free.
Adhesives and Fasteners
Choosing the right adhesive is vital in cosplay foam construction. Contact cement is the gold standard for strong, flexible bonds, especially for wearable pieces. Hot glue offers quick setting but is best for small details, while super glue works well for rigid, non-flex joints.
For attaching straps, buckles, or Velcro, mechanical fasteners provide durability and allow for easy adjustments. To avoid messy seams, apply glue sparingly and press pieces firmly together. Always test adhesives on scrap pieces of cosplay foam to ensure compatibility and clean results.
Heat Forming and Surface Tools
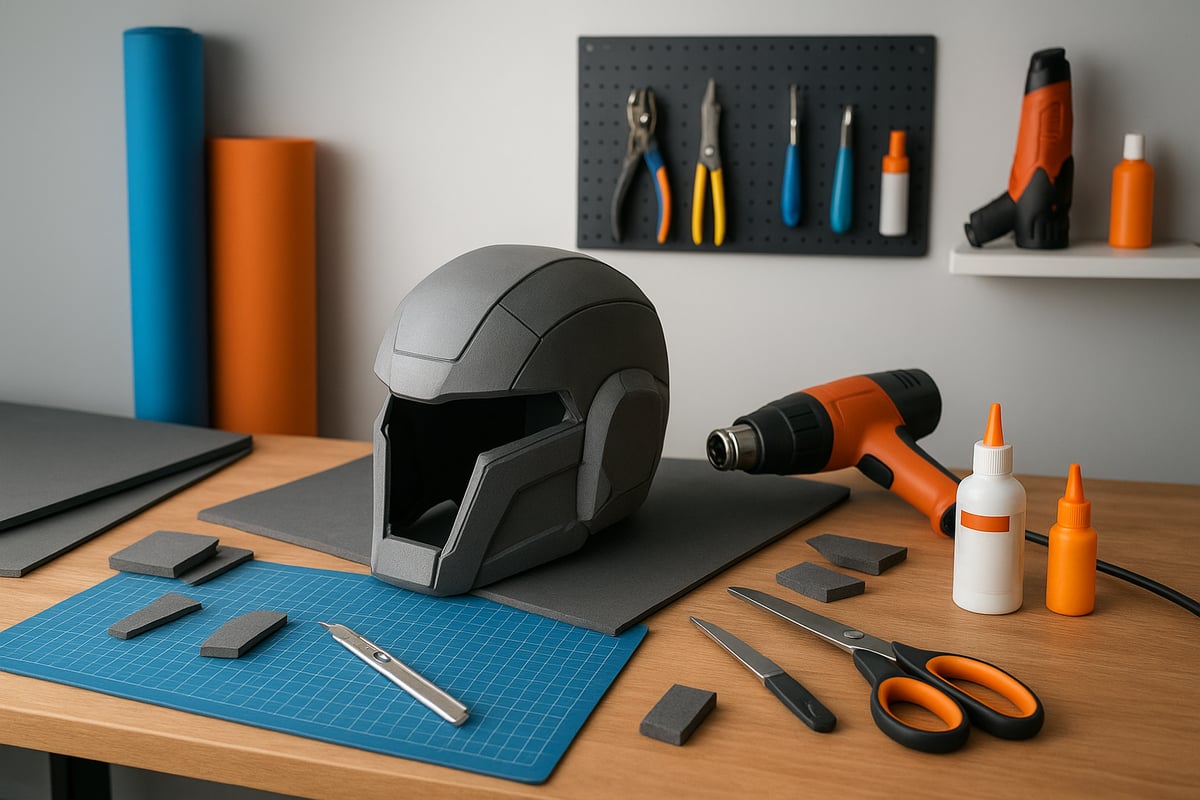
Heat forming transforms flat sheets of cosplay foam into complex, three-dimensional shapes. A heat gun is essential for shaping curves and adding depth, with temperature settings tailored to the foam type. Soldering irons are perfect for engraving lines or surface textures, while rotary and manual sanding tools help smooth rough edges.
When forming helmets or armor, gently heat the foam and bend it over a form or mannequin for best results. Always allow cosplay foam to cool and set fully before further assembly to lock in the shape and prevent warping.
Finishing Supplies
Finishing is where cosplay foam truly comes to life. Foam sealers such as Plasti Dip or latex caulk create a smooth, paint-ready surface. New sealants in 2026 offer improved flexibility and faster drying times.
Use high-quality primers and paints, with airbrushes providing professional-level shading and gradients. For added realism, employ texturing tools like embossing plates or stencils. Store finished cosplay foam pieces in a cool, dry place to maintain their appearance and durability between events.
Step-by-Step Foam Cosplay Construction Techniques
Mastering cosplay foam construction requires a methodical approach. Each phase, from creating templates to final paintwork, builds toward a professional, durable costume or prop. Let us explore the essential techniques every cosplayer should know in 2026.
1. Patterning and Template Creation
Successful cosplay foam builds start with precise patterns. Digital tools like Pepakura and 3D modeling software help generate accurate templates tailored to your body. Print these templates and transfer them to cardstock or poster board for durability.
Flipping patterns ensures symmetry, especially when crafting mirrored armor or gauntlets. Always check your sizing by holding templates against your body, making adjustments before cutting foam. This foundational step saves time and reduces material waste during the cosplay foam construction process.
2. Cutting and Shaping Foam
Once your templates are ready, it is time to transfer them onto your selected cosplay foam. Use a silver marker or chalk for high visibility on darker foam colors. Sharp Xacto blades or razor knives are vital for clean, straight cuts.
For curves and bevels, adjust your blade angle and use multiple passes to avoid jagged edges. Always replace blades frequently, as dull blades compress foam and create rough surfaces. Clean cuts are crucial for seamless joints and professional-looking cosplay foam pieces.
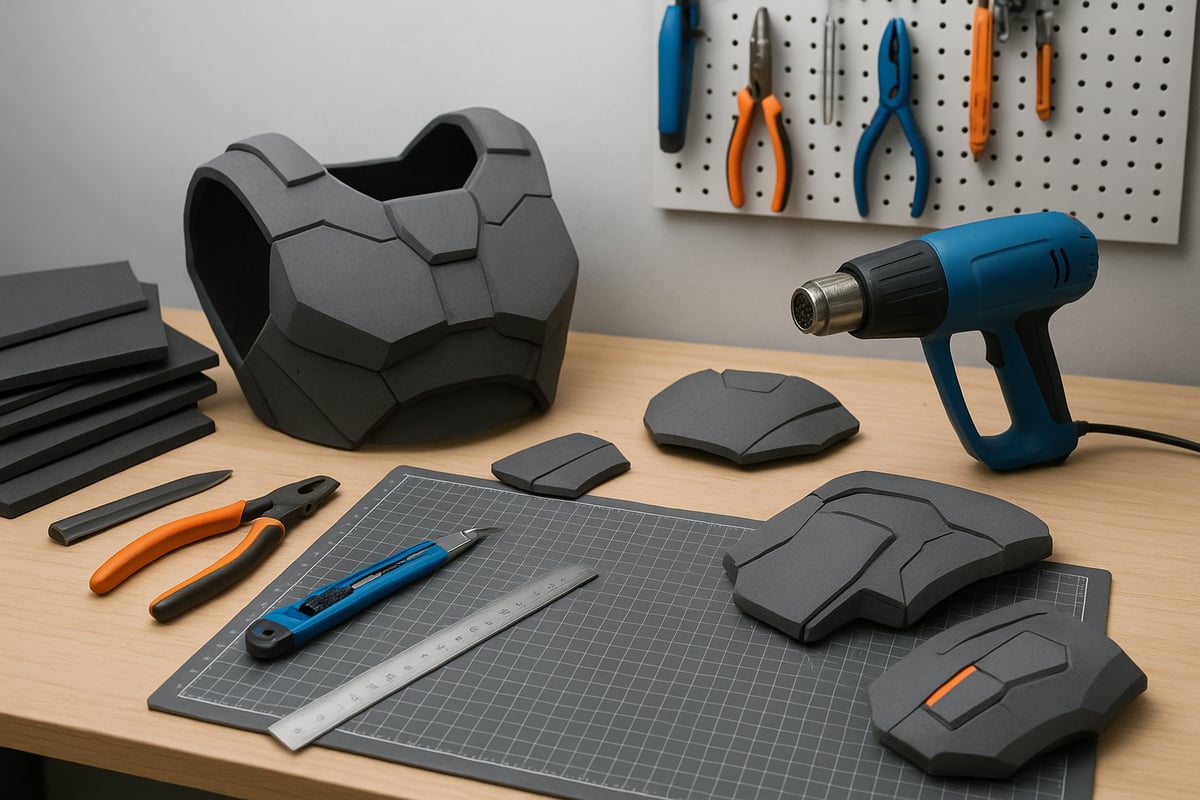
3. Heat Forming and Assembly
Heat forming brings your cosplay foam to life by adding curves and depth. A heat gun is the primary tool, allowing you to gently warm the foam until it becomes pliable. Carefully shape it over a rounded surface or mold, holding it in place as it cools.
Layering foam sheets creates dimensional effects, like raised armor panels or helmet contours. When assembling complex builds, plan the order of gluing to avoid inaccessible seams. Patience and precision at this stage ensure a strong, cohesive cosplay foam structure.
4. Detailing and Surface Effects
Details elevate cosplay foam builds from basic to extraordinary. Thin foam sheets add raised accents, while a soldering iron can engrave lines or textures directly into the surface. Use this technique for mechanical seams, organic scales, or decorative motifs.
Sculpting organic forms, such as dragon scales or fur, involves layering and trimming smaller foam pieces. For sci-fi elements, create panel lines or geometric patterns with engraving tools. Consistent detail work makes your cosplay foam projects visually striking.
5. Reinforcing and Internal Structures
Large or articulated props require internal support to maintain shape and durability. Insert PVC pipes, wooden dowels, or aluminum rods into the core of your cosplay foam builds for added strength. For massive weapons or wings, using Giant Projects EVA Foam Rolls provides a stable base and reduces seam lines.
Magnets, snaps, and Velcro allow for removable or modular parts, enhancing transportability and wearability. Planning reinforcement early prevents structural failures and extends the lifespan of your cosplay foam creations.
6. Sealing and Priming Foam
Sealing is essential to protect cosplay foam and prepare it for painting. Apply several thin coats of Plasti Dip, latex caulk, or new 2026 foam sealants to create a smooth, flexible barrier. Allow each layer to dry fully before proceeding to the next.
Proper sealing prevents paint absorption and increases surface durability. Watch for bubbles or uneven coverage, correcting them before paint application. A well-sealed cosplay foam surface ensures vibrant, long-lasting results.
7. Painting and Finishing Touches
Painting transforms cosplay foam from raw material into finished art. Begin with a base coat, choosing colors that match your reference images. Use masking tape for sharp lines and airbrushes for subtle shading or gradients.
Weathering techniques, such as dry brushing or washes, add realism by simulating metal wear or battle damage. Accent with metallic or pearlescent paints for extra dimension. Before wearing, inspect every detail and touch up as needed to ensure your cosplay foam build shines on display.
Advanced Foam Techniques and Innovations in 2026
Cosplay foam techniques are evolving at an unprecedented pace, unlocking a new era of creative expression for builders at every level. In 2026, advanced methods blend digital tools, hybrid materials, and eco-conscious practices, making it possible to achieve astonishing detail, durability, and realism in every project. Let us explore the latest innovations shaping the future of cosplay foam.
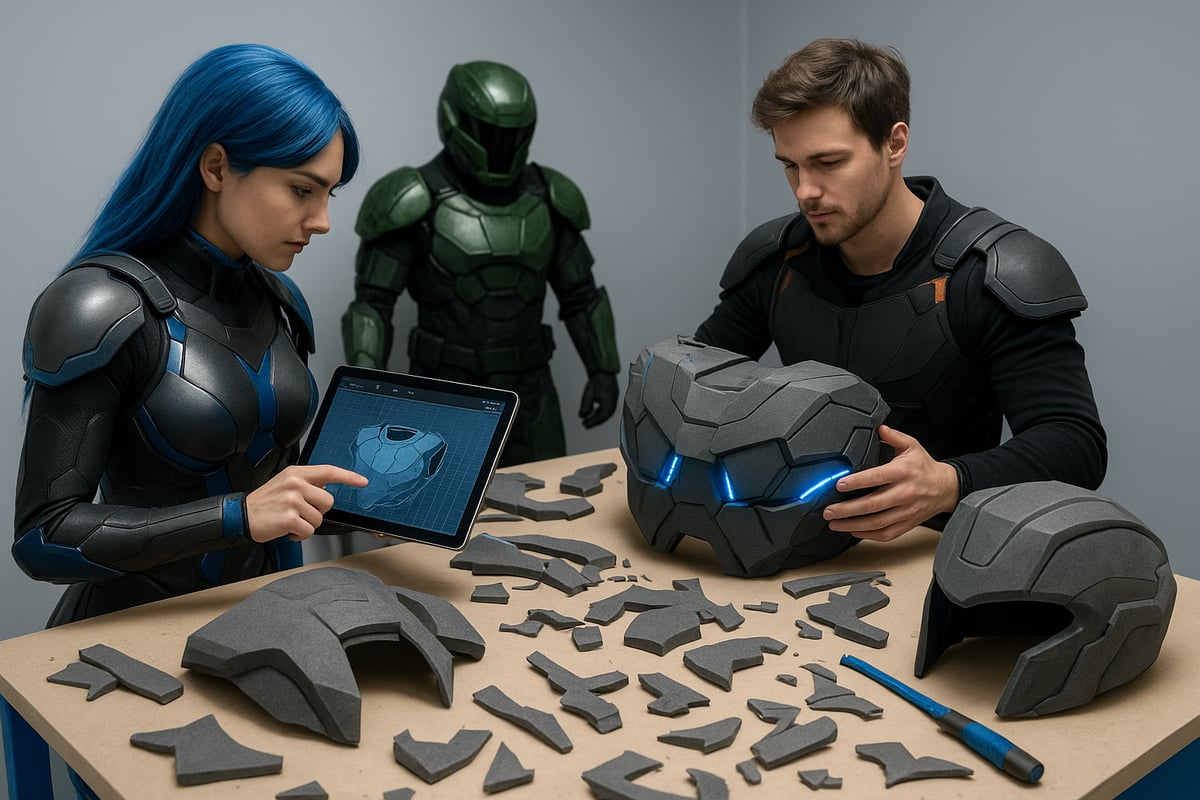
3D Patterning and Digital Tools
Digital innovation is transforming how creators use cosplay foam. 3D scanning and modeling software allow for precise pattern drafting tailored to each individual’s measurements. Makers now use 3D printers to produce custom stencils and templates, ensuring accuracy and symmetry for complex armor and props.
Popular software, such as Blender and Pepakura, integrates seamlessly with foam crafting. These tools help convert digital files into cut-friendly patterns, minimizing errors during construction. For those seeking to stay ahead, resources like The 2026 Cosplay Masterclass: 7 Tech Trends, Tool Upgrades & Katsucon provide valuable insights into the latest digital trends shaping the cosplay foam landscape.
Hybrid Builds: Combining Foam with Other Materials
Hybrid builds are redefining the boundaries of cosplay foam design. By blending foam with 3D printed plastics, fabrics, and thermoplastics, cosplayers achieve lightweight yet robust results. For example, foam armor can be paired with 3D printed joints for enhanced articulation, while transparent thermoplastic visors add a futuristic touch.
LED integration is now more accessible, with channels and cavities built directly into foam structures. Mixed-media techniques allow for seamless transitions between soft and hard surfaces, creating visually stunning effects. Experimenting with hybrid materials makes cosplay foam projects more versatile and durable.
Texturing, Embossing, and Realistic Effects
Creating hyper-realistic finishes is easier than ever with advanced texturing and embossing tools. New embossing plates designed for cosplay foam enable makers to imprint organic or mechanical patterns without adding weight. Sculpting tools and heated tips allow for deep engraving, perfect for simulating dragon scales, leather, or sci-fi panel lines.
Modern airbrush paints and flexible coatings enhance the foam’s surface, making it possible to mimic metal, rust, or battle damage. These effects bring characters to life, ensuring each cosplay foam piece stands out on stage or in photos.
Large-Scale and Articulated Builds
Engineering large props and articulated costumes with cosplay foam requires strategic planning. Modular construction techniques help break down giant builds, such as wings or mech suits, into manageable sections for easy transport and assembly. Harness systems distribute weight evenly, maintaining comfort during long wear.
Articulated components, like moving limbs or expanding armor, use internal frames paired with foam exteriors for visual impact without excess bulk. The result is impressive mobility and stability, enabling cosplayers to bring ambitious designs to life.
Sustainability and Foam Alternatives
Sustainability is now a key focus for cosplay foam enthusiasts. Eco-friendly foam options are emerging, offering similar performance with reduced environmental impact. Makers are adopting efficient cutting layouts and reusing offcuts to minimize waste.
Safe disposal practices and recycling programs for foam scraps are gaining traction. Looking ahead, biodegradable foams and plant-based adhesives promise a greener future for the cosplay foam community. Embracing these alternatives ensures creativity and responsibility go hand in hand.
Troubleshooting, Tips, and Community Resources
Cosplay foam projects bring excitement and creativity, but challenges are inevitable. Knowing how to troubleshoot common issues can make the difference between a frustrating experience and a flawless finish. With some preparation and the right resources, you can tackle problems quickly and keep your cosplay foam creations looking their best.
Common Foam Cosplay Challenges (and Solutions)
Even seasoned makers encounter issues with cosplay foam. Seams may split or peel after frequent use. To prevent this, always reinforce critical joints with extra adhesive and consider adding an internal support. Paint cracks can occur when the foam is not properly sealed or primed, so use flexible sealers and paints designed for cosplay foam.
Foam warping is another challenge, especially in humid conditions. Store finished pieces flat or on mannequins to retain their shape. If a prop is damaged during a convention, quick fixes like hot glue or contact cement can provide temporary repairs until you get home. Keeping a small repair kit in your cosplay bag can save the day.
Beginner Mistakes to Avoid
Starting out with cosplay foam can be overwhelming. Beginners often use too much or too little glue, leading to weak bonds or messy seams. Under-sealing is another frequent error, which results in paint that chips or peels. Always apply a consistent layer of sealer before painting your cosplay foam.
Comfort and mobility are just as important as looks. Avoid building heavy or rigid costumes that restrict movement. Proper ventilation is crucial when heat forming or painting—work in a well-ventilated area and wear a mask if needed. For example, oversized armor may look impressive, but if it is not wearable, it will not last through a convention.
Expert Tips for Professional Results
To elevate your cosplay foam work, focus on layering techniques for depth and realism. Use thin foam sheets to add raised details or create texture. Advanced weathering, like dry brushing or airbrushing, brings props to life. Time-saving hacks, such as batch cutting and painting, are essential for large projects.
Reference photos help ensure accuracy, especially for complex designs. For more insights on current innovations, check out the 7 Top Trends in Foam Design for 2025, which highlights new materials and methods shaping the future of cosplay foam. Staying informed helps you achieve professional finishes on every build.
Community, Tutorials, and Further Learning
The cosplay foam community is vibrant and supportive. Top YouTube channels like Punished Props, SKS Props, Odin Makes, and Kamui Cosplay offer detailed tutorials for all skill levels. Online forums, Discord servers, and subreddits such as r/CosplayHelp are great for troubleshooting and sharing tips.
Attend workshops and conventions in 2026 to gain hands-on experience and meet other makers. Stay updated with new products and trends by following industry leaders and joining local cosplay groups. If you are looking for quality materials, resources like Crafters EVA Large Foam Sheets can help you source the perfect foam for your next project.
Templates, Patterns, and Resources for 2026
Unlocking your creativity with cosplay foam starts by sourcing the right templates and patterns. In 2026, creators have more tools and resources than ever to jump-start any project, from iconic armor to intricate props.
Sourcing and Using Digital Templates
Finding the best digital templates for cosplay foam builds is easier than ever. Many creators rely on free and premium Pepakura files, which provide ready-to-use patterns for popular characters. These files can be downloaded from community marketplaces or shared by experienced makers.
When working with digital templates, always adjust for foam thickness and flexibility. This ensures your cosplay foam pieces fit together perfectly. Most designers recommend scaling templates to your own body size before printing. Using digital modeling software, you can preview how each piece will look and make precise adjustments for comfort and mobility.
Community forums and creator marketplaces are excellent places to find unique or custom designs. Whether you want to replicate a classic superhero or design something original, digital templates streamline the entire process for cosplay foam projects.
Creating Custom Patterns from Scratch
Sometimes, a custom fit or unique design calls for original patterns. Start by measuring your body or the item you want to replicate. Poster board or cardstock is ideal for drafting prototypes, as it is easy to cut and modify.
To ensure your cosplay foam patterns match your shape, use mannequins or duct tape dummies for reference. Test-fit your prototypes and adjust for movement and comfort. Once satisfied, transfer your final pattern to the foam, remembering that precise markings lead to cleaner results.
Digital modeling tools can also help refine your custom patterns. For complex shapes, 3D scanning or modeling allows you to visualize and tweak your cosplay foam build before making any cuts. This reduces material waste and improves the professional look of your finished costume or prop.
Essential Resource List for Modern Cosplayers
Building with cosplay foam in 2026 means having access to a wide range of suppliers and digital tools. Reliable sources for foam, adhesives, and specialty tools include both local craft stores and online retailers. Many shops now offer cosplay-specific foam in various thicknesses and densities.
For patterning and design, software like Pepakura Designer and Blender are industry standards. Online platforms host thousands of tutorials, guides, and downloadable resources. Books and workshops provide deeper skill-building opportunities, while safety guidelines ensure proper handling of tools and materials.
For those interested in advanced foam design, research such as Fabrication-Directed Entanglement for Designing Chiral and Anisotropic Metamaterial Foams offers insights into cutting-edge techniques that can elevate your cosplay foam projects. Staying connected to the community through forums or Discord servers keeps you up-to-date with the latest trends and innovations.
As you explore the latest foam techniques and discover how EVA foam can transform your cosplay builds in 2026, it’s inspiring to see just how versatile this material can be. If you’re curious about what’s possible beyond costumes—like how foam artistry creates stunning, larger-than-life sculptures for unforgettable events—there’s so much more to learn. I encourage you to see how professional creators are pushing the boundaries with EVA foam in the world of event design and décor. Want to know more about these flowers? Want to know more about these flowers?